How To Make A Beach/Craft Bag From A Pillowcase.
Supplies Needed:
26” of ½” elastic
Approximately 40” of trim for the top of the pockets
6 or more 6” pieces of trim for the vertical separations on the pockets
Approximately 36” of trim for the top of the bag (or exact circumference of your pillow case)
18” of trim for the handle (cut after you measure your handle)
2 decorative buttons
Lets Get Started:
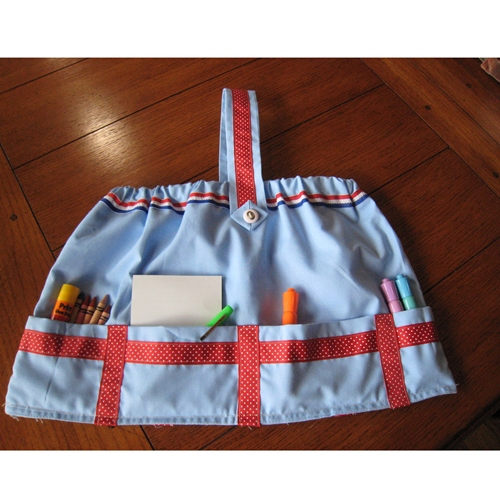
Handle - Wash and iron pillow case. Cut a strip 2 1/2” wide from the sewn short edge of the pillow case. Take the 2 1/2” strip and turn it inside out. Sew along the cut edge leaving a hole about 2” in the middle of the strip to pull it through to bring the right side out. Pull right side out and slip stitch the 2” hole closed. Iron the handle so the seam is down the center and both edges are folds. Flatten both end points toward the center seam to form a square at both ends. Lay and pin the trim on the handle. Sew it securely down being careful not to sew the square end. The ends of the 18” of trim will be hidden under the square. The square will become a design feature to sew on a decorative button. Set aside for now.
- Pockets of the Bag - Turn the pillow case inside out. About ½” from the folded edge of the hem on the wrong side, sew the 21” piece of trim so it goes all the way around the hem. Turn the pillow case right side out. The hem of the pillow case will now be folded over (wrong side out) and trimmed to form the pockets on the right side. Place the 6” pieces of trim around the pocket made by the hem. The 6” pieces will form individual pockets around the outside of the bag. You can use a piece to cover the sewn hem side seam if you like. You will be sewing the hem and trim to the layer of pillow case directly behind it to form the pocket sections. Be sure you dont sew through all layers. You should still have a tube with pockets all the way when you are done.
- Bag - Lay the pillow case flat right side up on a surface with the pocket end toward you. Now take the cut side of the pillow case and bring in through the center of the tube, putting wrong side of the pillow case to wrong side of the pillow case and matching the bottom edge of the hem to the cut edge of the pillow case. You are making the bag lining in this step. You should see a fold on the top and the pockets at the bottom. There should be 4 layers of fabric on the bottom, 2 raw edged and 2 folded (pockets). Pin all 4 layers together to keep it even. Tuck all the loose ends into the bottom and sew across, making sure you have captured the pockets and 2 liners . Sew again about ¼” up from the bottom for added strength. Next press the fold at the top of the bag. Sew the decorative trim about 1“ below the fold. Open the side seam in the casing you just sewed, using a safety pin on one end, insert the elastic into the casing. Sew the elastic ends together with a machine. Hand stitch the casing opening closed. Add the handle in the center or the edges as desired, opening up the square formed in each end. Add an accent button to the center of the square.
- Congratulations you have made a really cute and useful tote for the beach or for crafting.